How to Create a Table in WordPress Without Plugin?

An ideal blog post today which you want to rank #1 in Google demands a lot of things, blogging isn’t like Instagramming or putting up a video on TikTok. 

Blogging on Instagram is like simply putting up an aesthetic image with 6-7 lines caption and up to 4 hashtags and bam! It’s good to go. Do it 5X a day and boom if your content is good & your feed visually makes sense then you have won it.

Blogging on the other hand is quite exhaustive, back in the day publishing just a 500 word article (which hardly takes 30-40 minutes) was enough to rank well and drive consistent traffic.

However the rules are changed now, 2 things that are super-important to winning in Blogging today are

#1 Lengthy blog post, like +2000 words 

#2 Blog UX

Google doesn’t see potential in blog post with low content to rank, at the same time blog UX ensures that though the content is lengthy people should still end up reading the whole piece. The UX does justice to the length.

One simple user experience tweak that you can effortlessly add to your lengthy blogs is adding table of contents.

Nearly every long-form content has got pointers, some good examples will be,

“20 Reasons To Take A Solo Trip In Your 20’s”

Blog post like these has tons of pointers, and it can be really painstaking for readers to directly jump to a point they would like to read. Just by adding a table of contents where upon clicking a content from table the user can jump to the point, then that would be terrific wouldn’t it be?

Yes, there are tons of plugins that automates the process, but if the goal you have with your website is to have a seamlessly faster website then you should refrain from highly relying on plugins to do things as plugin makes your website slower as it adds a bunch of PHP code, requests and scripts.

Besides coding your own table of contents is easier than you think.

Here is How to create a Table of Contents without Plugin

This is actually just a 2 step process

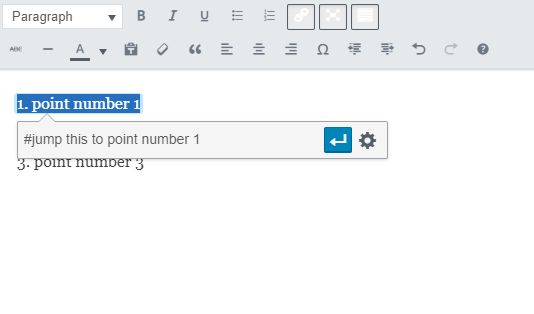
1. Add location of jump on the point with #

Once you create the text-typed table, you will need to add the jump location of the point with #.

The simple way to do that is by selecting the text of the point and pressing ctrl+k and typing the text with # initial in the address bar. You will need to use the same text after the # where you want that click to be jumped.

page jump linkThe exact code for the same will be.

For example; you want to jump “Instagramming is Fun” pointer to “Instagramming is Fun” point right below where it is comprehensively explained. 

So in the table of contents you “Instagramming is Fun” in the code will appear as you will use the same text of that point i.e instagramming is fun at the jump location of that point.

2. Add the anchor on the location where the users should arrive upon clicking on the table of contents pointer

table of contents without plugin

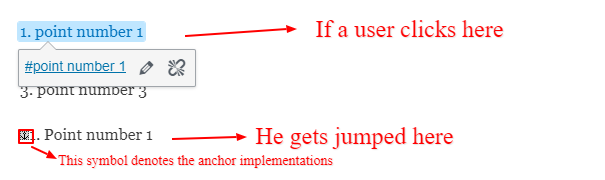
Now it’s time to add the code on the location where the click should lead to, the code for the same is.

Continuing the same example
<a href=”#instagramming is fun”>
<a name=”instagramming is fun”></a>

P.S for a point and the jump location you can use any anchor text or even numbers, the only condition is that the same content should be there in both

P.P.S You can also use this page jump link code on images, in case you want to use Image Icons instead of text as a means to jump users to certain scroll of the page, Brian Dean does this really well in his blog “Backlinko”

backlinko page jump link

So, that was it; this is exactly how you can code your very own Table Of Contents with Page Jump Links following easy 2 step process.

Leave a Comment